Today we're going to look at some very fun and easy ways to create some embellishments using your
'Sew Embellishy' mini Quirky Kit. If you have a kit you won't need anything extra apart from a needle and a pair of scissors. If you don't have a kit gather together some fabric, felt, sequins, embroidery thread and buttons. One top tip for making fabric embellishments is to have a favorite pair of scissors to keep just for fabric. These don't have to be specialised fabric scissors any sharp pair of scissors will suit the job but make sure you keep them exclusive to fabric use as cutting paper with them will blunt your scissors. OK on to the fun stuff!
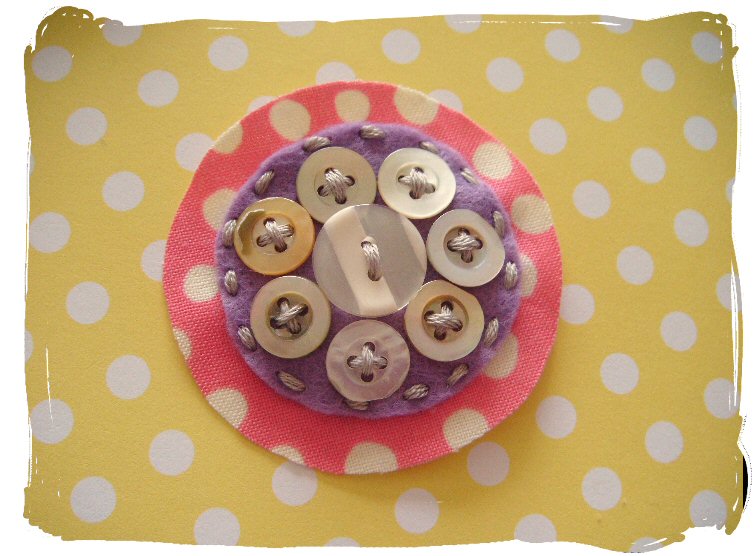
1
To make this embellishment stitch one large button on a piece of felt then stitch smaller buttons around it.
Cut out the buttons in a circle leaving a small edge of felt.
Stitch the felt circle to a piece of fabric with small stitches all around the edge of the felt.
Cut it out leaving a small edge of fabric.
Stitch this on to another piece of fabric this time using a blanket stitch all around the edge. All this means is just stitching top to bottom instead of side to side.
Cut it out to finish.
2
To make this embellishment you need 1 fabric, embroidery thread and one large button.
Cut out a small square of fabric, roughly 1 inch square and fold it in half.
Cut out half a heart shape, it's rounded at the top and then goes to a point, this is how most people would cut a heart shape from paper.
Cut out three of these hearts and layer them together in a flower shape then fix with a button in the center. When cutting the thread at the back of your flower leave one edge long to create a 'stalk'.
3
You can make other embellishment by folding fabric like this butterfly. Fold the fabric in half and cut out half a butterfly shape then open out to reveal how your butterfly looks. You can use this as is with a raw edge or applique it on to another piece of fabric or felt.
4
For this one you'll need three fabrics and embroidery thread.
Tear off a long strip of fabric about 1.5 inches wide. Stitch a loose running stitch down one side. When you've got to the end pull the thread so it gathers up the fabric and stitch the ends together to keep it gathered.
Cut out two leaf shapes from a different fabric and layer them one on top of the other. Fix to your gathered fabric piece with one stitch in the center.
Cut out a small strip of fabric and fold it in half lengthwise. Stitch a running stitch along the folded edge and pull tight as before. Stitch the ends together but keep your thread fixed on.
Push your needle up through the middle of your 'rosette' and then push the needle back through so you leave a loop of thread, keep doing this several times then secure at the back and trim the thread off.
Cut the loops of thread and trim them down. Sew or glue this to the middle of your embellishment.
5
For this one get your strung sequins, felt and pearl buttons from your kit.
Strung sequins are great for making shapes as they're nice and 'fluid' you can bend them into shapes. You can make a very simple leaf shape, make one on your piece of felt then stitch in place. If you prefer you can glue them down even.
Cut out the leaf shape from the felt and stitch on a couple of buttons on the inside. This could also be a way to make a flower embellishment creating one of these for each petal.
6
This is a really simple one, you'll need one fabric, thread and one button.
Tear off a strip of fabric along the longest length, (10 inches). Fold it up in a concertina fashion so you end up with a roughly 1 inch square.
On one of the open edges round off the edge.
Open out your fabric and you should have a pattern like this on one edge.
Stitch a running stitch along one edge
Pull the thread tight so the fabric gathers.
Stitch the two open edges together to fix in place.
Sew a button in the middle to finish. You could also add a brad in the center if you wanted.
7
This one is made in a similar way
Concertina your strip of fabric as before but this time cut one of the open edges off in a point.
When you open out your fabric it should look like this
This time when you do your running stitch take care to add one stitch underneath each 'point'
Pull tight and then stitch the open edges together at the back to fix in place.
Open out the 'petals' and stitch a button in the center to finish.
8
This one just needs fabric
Tear off some thin long strips of fabric
Take one of the strips and tie a knot in it then trim it down.
Tie another strip the opposite way. Keep going until you've build up your 'flower' as large as you want it. These make great embellishments to use as pins on bags.
Now I've made all these different embellishments and still have this much of the kit left...
So we'll have to make some more another day.
What can you come up with? If you've made something fun share the link in the comments.
xx Leo


 I also made a pocket page from the card, blanket stitching it in place using the kit's embroidery thread:
 I adore the double sided spots / grid design from the 4heures37 ‘les basiques’ range. Here I simply folded over the paper down the inner edge making both patterns visible at once.
  I then aged the paper using, appropriately enough, a Ranger Distress Ink in 'Old Paper':
 Continuing with the aged and worn feel - which seemed somewhat more manly than some papercrafting techniques - I made an additional pocket-page from the Glitz Designs 'Kismet Stripe' patterned paper and some large eyelets:
 And here's what the pages look like all together:
 Both me and [hopefully] my partner are going to be adding photos and journalling about the various places he's lived and traveled to .. or photos etc from this year ... we're not quite sure yet.

 As you can see I layered up the fabrics with embellishments in exactly the same way I would would with a layout.


